
Okay, so I’m a little late for Halloween, but I was pretty proud of this thrift store DIY, and it got a lot of compliments, so I wanted to share. You can file it away for next year, or if you’re like my family back home and enjoy renaissance faires, you might use it sooner. So I am going to show you how I made my dress and hopefully inspire a project of your own!
The first step, of course, was deciding who we wanted to be. Joe and I are fans of Disney/kids’ movies. He’s naturally a big guy and I like to wear pretty things (FYI, putting on a princess crown is pretty much an instant fix for a bad day). So with a little deliberation, we chose Shrek and Fiona. Then, after Googling our characters to check outfit details, we hit the thrift store to see what we could find, because it’s cheap and fun, and the craft store for the rest.
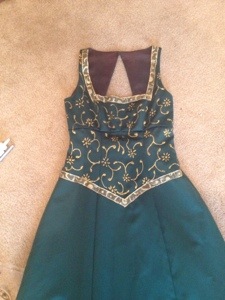
I was looking for either a green shirt and skirt or a full dress, and ended up finding a sleeveless dress and a long sleeve shirt to wear under it. Then I bought gold ribbon and fabric paint for the decorations. The dress had some bows and a high neckline, so the first step was removing the bows and cutting the neck square (had to cut the shirt neck too to match). Don’t mind my cat, he likes to “help.”

After that, I tried it on and pinned the ribbon at the neck and waist. I don’t currently have a machine so the hand-sewing was a little tedious and probably doesn’t look great up close, but it does the job. You can also use fabric glue but, after testing on a scrap, I decided I didn’t like the look.

Once the ribbon was in place, it was time to grab the fabric paint and design the bodice. I rolled up a towel and placed it under the bust to keep the shape (so the folds wouldn’t get in the way). Following a picture of Fiona’s dress, I drew the flowers and then filled in the vines in between, one small area at a time, until the bodice was covered, then let it dry.
Besides a few more adjustments to make it fit, the dress was done! I used This Fabulous Little Tutorial I found on Pinterest for the tiara, and I dyed my hair red with Clairol Natural Instincts. It lasts 28 shampoos, a bit of a commitment for a costume, but I have never dyed my naturally brown hair until now, and I’d been wanting to try it.

My husband’s Shrek costume consisted of a white thermal and plaid pants (women’s pants, also from the thrift store. “Now I know why girls wear tight pants. They accentuate your butt.”) I ended up buying some fabric last-minute and making a short vest, traced from a vest he had lying around. Also made the ears out of craft foam, and he wore green body paint, a pillow for a belly, a belt, and boots.

So here we are in our finished costumes! We won best couple costume at our friends’ big Halloween party (for the second year in a row! Last year we were Mr. & Mrs. Incredible). I hope you enjoyed the tutorial! Thrift store shopping can be very hit-or-miss, so of course each project is going to look different, but I hope this gave you some ideas! We would love to see photos of what you come up with!

Thanks for reading!


Your costumes are amazing!!!! Looking forward to seeing your blog unfold; fabulous title by the way. 🙂
Thank you! I am a big fan of fairy tales 🙂
Clever and crafty! You look great as a Redhead!
You make decorating the bodice sound so simple, but it would take me at least 20 attempts to get anything that uniform and consistent. Great job! Thanks for sharing the steps.
Thanks!! Haha, well I should have mentioned I did practice on a scrap first…
BTW, You inspired me (not to create a costume but to experiment with red hair dye). I think it looks much better on you ^_^
Did you try it already? I’d love to see a photo!
I posted two on Facebook yesterday. The first is how it actually looks. The second is enhanced through a fun filter to make the red brighter.
I guess I’m not seeing everything on my Facebook lately. I’ll have to go look!
Pingback: DIY Incredibles Couple Costume | Hold My Broom
Thanks u are a lifesaver! !!!